Initialization scripts – Lions, Tigers, and Containers – Oh My! Podman and Friends
Initialization scripts
Most containerized databases feature a way to facilitate the running of scripts after initial setup, which can be very handy. This is typically done by allowing the user to mount a directory from the host machine that contains .sql and/or .sh files into the /docker-entrypoint-initdb.d directory of the container. The scripts are generally executed in alphabetical order and thus can be easily controlled by adding a prefix with a number, for example, 01_users.sql, 02_permissions.sql, 03_hostname.sh, and so forth:
- The MySQL database:
The MySQL database supports *.sh and *.sql scripts in the following mount points:
/docker-entrypoint-initdb.d
- The PostgreSQL database:
The PostgreSQL database supports *.sh, *.sql, and *.sql.gz scripts in the following mount points:
/docker-entrypoint-initdb.d
- The MongoDB database:
MongoDB supports *.sh and *.js scripts in the following mount points:
/docker-entrypoint-initdb.d
- The Oracle database:
The Oracle database supports *.sh and *.sql scripts in the following mount points:
- /opt/oracle/scripts/setup: Post-setup scripts
- /opt/oracle/scripts/startup: Post-startup scripts
- /docker-entrypoint-initdb.d: Symbolic link representing the aforementioned directories
Controlling the startup order
Using a Compose file, you are able to control the startup order of your containers by using condition attributes. A nice way to ensure your database is up and running (and ready to accept connections) is to configure a health check against the database. Once the health check succeeds, the database container will become healthy. The application that requires the database can be configured not to start until the database container enters a healthy state. This can be done using the depends_on option.
If you wanted to add a health check to a PostgreSQL database, you could configure that with the following:
healthcheck:
test: pg_isready
start_period: 5s
interval: 5s
timeout: 5s
retries: 55
Then, for the application, you would simply specify the service name (in this example, wikijs-db):
depends_on:
wikijs-db:
condition: service_healthy
When these options are configured properly, you will no longer see repeated connection failures as the application tries to connect to a database that isn’t ready, because the application container won’t even start until the database container is healthy.
Tying it all together
Now that we’ve discussed these database best practices, it’s time to tie it all together with a Compose file to deploy a WordPress website. WordPress requires a MySQL database, so in the Compose file, we’re deploying two services: wordpress01 (WordPress content management system) and wordpress01-db (MySQL database).
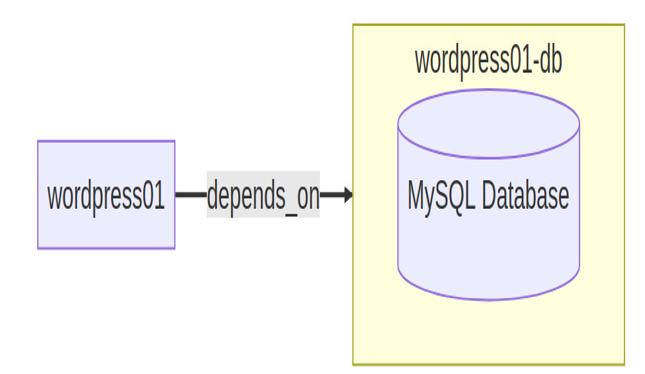
Figure 11.8 – Visual topology of an application and its database
In the wordpress01 service, we can easily reference the database host by the name label assigned to the service of the database – this is all thanks to the awesome name resolution capabilities supported by Podman dns plugins. You’ll also see that we are leveraging a health check on the wordpress01-db service so that it doesn’t become healthy until mysqladmin is able to get a response from pinging the database service, and wordpress01 is configured with depends_on so that it will not try to start until wordpress01-db is in a healthy state. Since this example is intended to be a quick proof-of-concept deployment, I chose to use a named volume rather than a bind mount for the data, but you can also see the use of a bind mount for the initialization scripts. Last but not least, notice that we’re using a dedicated database container (wordpress01-db) that is complementary to the application container (wordpress01). The contents of the Compose file for this WordPress website might look something like this:
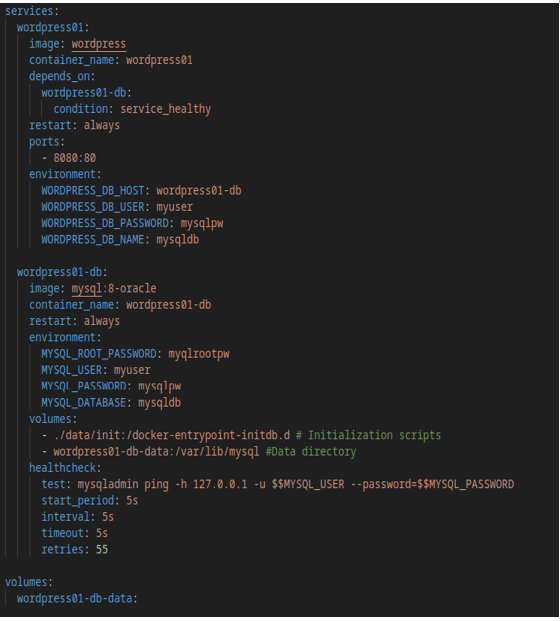
Figure 11.9 – Compose file for WordPress
Go ahead and try to deploy this setup for yourself. You can view the logs of the application with podman logs -f wordpress01 to see that it connects to the database successfully on the first attempt. Let’s use Docker Compose to create and start the containers. You can do that just as we described in the earlier recipe on Docker Compose, by navigating to the directory where your docker-compose.yml file lives and running the following command:
docker-compose up -d