Docker Compose with Podman – Lions, Tigers, and Containers – Oh My! Podman and Friends
Docker Compose with Podman
Podman is a powerful container engine that is typically accessed via a command-line interface (CLI) to facilitate the configuration and running of containers. It’s very handy to use the CLI to quickly launch a new container instance or to directly access existing containers, but what if you need to run multiple containers all at once? You could still use the CLI, but then you’ll probably get into the habit of copying and pasting long commands, which is not exactly the most ideal way of having a repeatable way of launching and deploying containers. Instead, why not use something such as Docker Compose? Docker Compose allows you to configure your container applications as code, in the popular Yet Another Markup Language (YAML) format. YAML is designed to be declarative and human-readable. With Docker Compose, you can define your multiple containers’ attributes, including volumes, environment variables, networking information, and more, all in a single docker-compose.yml file.
While Docker Compose is a great utility for configuring your containers as code, it’s important to know that Docker Compose was designed to be used with Docker. With that being said, there are a few things to be aware of when using Docker Compose with Podman.
Getting ready
We will require the following:
• Oracle Linux
• Podman
• Docker Compose
How to do it…
In this recipe, we’re going to talk about how you can use Docker Compose with Podman.
Since Compose files typically involve multiple containers and applications communicating with one another, I recommend the use of the Netavark- and Aardvark-based network stack rather than the CNI-based stack. Netavark and Aardvark are new in Podman 4.0 and offer reduced overhead and significant performance enhancements. Additionally, I experienced issues with the default CNI-based stack, whereas switching to Netavark and Aardvark enabled my containers to communicate with each other as expected:
- To switch out your network stack, simply specify netavark as the network backend in the /usr/share/containers/containers.conf file. You can do this quickly by running the following sed command:
sudo sed -i ‘s/network_backend = “cni”/network_backend = “netavark”/g’ /usr/share/containers/containers.conf
sudo podman info | grep networkBackend
NOTE
If you already running containers on your system, you will need to run sudo podman system reset in order to fully switch to the Netavark- and Aardvark-based network stack, but just be aware that this command will remove all your existing images, containers, pods, networks, and volumes.
- Now that is out of the way, let’s start by installing Docker Compose:
sudo curl -SL https://github.com/docker/compose/releases/download/v2.20.3/docker-compose-linux-x86_64 -o /usr/local/bin/docker-compose
sudo chmod +x /usr/local/bin/docker-compose
- While we’re at it, since Docker Compose expects to make calls to Docker (rather than Podman), it might be a good idea to install the podman-docker package to ensure Podman is called anytime a reference to Docker is being made:
sudo dnf install podman-docker
- Next, we need to enable the Podman socket:
• To use Docker Compose in a rootless manner, use this command:
systemctl –user enable –now podman.socket
export DOCKER_HOST=unix://$XDG_RUNTIME_DIR/podman/podman.sock
echo ‘export DOCKER_HOST=unix://$XDG_RUNTIME_DIR/podman/podman.sock’ >> ~/.bash_profile
• To use Docker Compose in a rootful manner, use this command:
sudo systemctl enable –now podman.socket
sudo export DOCKER_HOST=unix:///run/podman/podman.sock
sudo echo ‘export DOCKER_HOST=unix:///run/podman/podman.sock’ >> /root/.bash_profile
- Now that Docker Compose is ready to go, we’ll need a Compose file to test things with. Let’s first examine a Compose file:
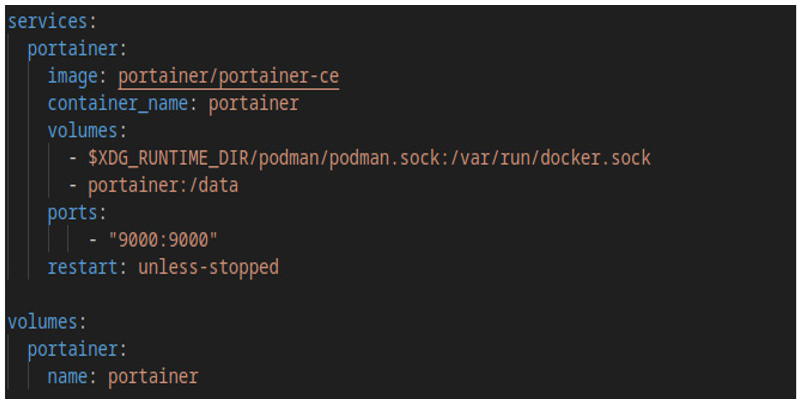
Figure 11.2 – Compose file for Portainer
In a docker-compose.yml file, we define how we want Docker (or Podman in this case) to run multi-container applications. In the case of this docker-compose.yml file, we define the services and the volumes we want Podman to create, and we configure various parameters of the service to our liking.
INFO
For a comprehensive overview of the entire Compose specification, see https://docs.docker.com/compose/compose-file/.
- Now, let’s test things and see if Docker Compose will work. Save the contents of the Compose file in a file named docker-compose.yml.
- Using the terminal, change directory to the same directory you saved the docker-compose.yml file in and run the following:
docker-compose up -d
If all goes well, you should see some activity in the terminal indicating that Podman is downloading the container image, creating the volume, and finally, it will start to run the container just as we defined in the Compose file.
- Once the container is running, navigate to the port we specified to see if it’s working as expected. To do this, simply point your browser to http://127.0.0.1:9000.
Congratulations, you are now using Docker Compose with Podman.